Speed up your internet by using Google DNS for free
So now when you know ‘What is Google DNS’ in simple words, you may want to use Google DNS on your Windows computer instead of default ISPs DNS. Just like OpenDNS, Google DNS can be easily setup on Windows based computer (XP, Vista and 7). It promises faster internet browsing as a result of quicker resolving of DNS for websites you surf.
Steps to setup Google DNS on Windows
1. Open Control panel. Goto Start > Settings > Control panel.
2. Click Network and Internet > Network and Sharing Center > Manage network connections.
3. Right click Local Area Connection or Wireless Network Connection and then click Properties.
4. Select the Networking tab, click Internet Protocol Version 4 (TCP/IPv4) and then click Properties.
5. Click Advanced and select the DNS tab. If there are any DNS server IP addresses listed there, write them down for future reference and remove them from this window.
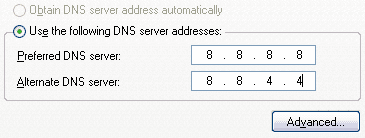
6. Replace those addresses with the IP addresses of the Google DNS servers: 8.8.8.8 and 8.8.4.4.
7. Click OK, restart your internet connection and Google DNS should be working.
posted by Virgo Websites at
6:00 AM
![]()

0 Comments:
Post a Comment
Subscribe to Post Comments [Atom]
<< Home